But the conclusion was that it might be faster taking MRT becuase it took me slightly more than one hour to reach SLS lor. Aigoo, 48 wasn't that fast enough. It was already 3.10 pm when I reached SLS le.
After stepping into SLS, the only thought I had was to quickly get the parts and zao. So immediately headed to the shop at level 5. After understanding the whole situation, e.g. checking out the casings, asked for the prices, what type (WD green, blue HDD), I went on proceed to order the parts.
But one saggy point was that when looking at the price list, I saw the motherboard and CPU bundle cost m $150 and not $140 which I saw when at home. Perhaps they raise price? But it turned out that all along I was looking at the wrong motherboard! Only to realise something was wrong when they took out the motherboard box and placed at the cashier counter. Upon double checking the invoice then I realised that I had ordered the wrong motherboard! Not the Asrock H81 but Asus H81 series motherboard which cost $10 more. Eyes pak stamps liao. Aigoo...
But nevermind, I still proceed with Asus because I feel that Asus motherboard really can last - current one is using Asus P5K series motherboard and I think it's a great motherboard. One of the desktops last time used Gigabyte one and I didn't think it's as lasting as Asus one. Just that this time round wanted to go budget and it seems that Asrock is something that I could try. Too bad, I'm sticking to Asus again! ^_^
The casing wasn't the CM 311 but model 342 instead. Looks good too. :)
Everything was done by 4 pm. Total cost: $532.
Took a cab home. Reached home already 4.45 pm. For the first time felt trip by taxi is slow. Cost me $13.70. Ok la, was expecting more than $20 ds.
Then 5pm WX whatsapped again say can go down with me to SLS (tomorrow). Aigoo, I already back. He literally go sag after I replied by exclaiming 'so fast!'... LOL~ Don't want to procrastinate further since early Jan mah.
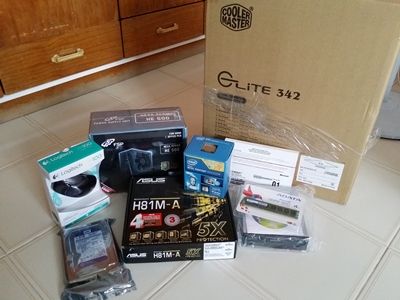
戰利品!
Satisfied with the purchase. The tower casing was smaller than I expected - I thought it should be the same size as mine one. Guessed I bought the 2nd largest size for my casing last time lol. But it wasn't a bad thing, in fact I would have preferred as small as possible as it's going to be placed on floor.
With no experience, I began to start assembling the parts. But where to start? Asus recommends building the processor first. On the contrary, Intel recommends locking the motherboard onto the chassis first before installing the processor. But anyhow, went with Asus's method because that way allows easier installation of processor, i.e. I can do the installation on table then transfer onto the casing.
Step 1: Following Intel's instruction, opened up the catch and placed the processor onto the gold-plated base. Closed the catch to lock the processor into place.
Step 2: Installed heatsink + fan on top of the processor. Connected the fan power supply cable to motherboard.
Step 3: Installed RAM.
Step 4: Mounted motherboard onto the casing. Attached the connector backplate to the motherboard and casing.
Step 5: Installed PSU.
Step 6: Installed DVD drive and HDD.
Step 7: Connected power cables to the casing fan, motherboard, DVD drive and HDD. Also connect the cable for casing power/HDD activity LED lights, power and reset buttons to the motherboard. Organised and tidied up the remaining PSU cables.
Tada! All it takes just 7 steps to complete the building of a computer. Of course it's time consuming. But luckily I had a little bit of experience in handling the SATA connections of the HDD so that part had been settled for. 不用那麼戰戰兢兢。Half-way went for dinner with instant noodles + yong tau foo! :)
After that went back to continue assembly. By the time physical assembly had finished, it was 8 pm. Next, it was to try to turn on the newly set-up computer.
Tada! There was BIOS message - the motherboard was able to receive power from PSU and detect all components. 成功了!好開心!
There is room for upgrading in future as the RAM is quite future-proof, capable of running at 1600 MHz. Now it's running at 1333 MHz due to processor limitation.
Then proceeded to install Windows which should be a very easy task by now. And the standard Windows activation + update and software installations followed. But couldn't finished everything in one go, so certain softwares had to be installed tomorrow.
To be continued...
No comments:
Post a Comment